Monday 26 January 2009

Random pond digging photos

I've just discovered a set of photos hidden in a file marked 'mum's garden' - I knew they were somewhere around but hadn't been able to find them. First-born had taken the photos and uploaded them into a little file within a file within a file, but having gone back to university wasn't around to tell me where on earth she had put them!

So I thought I'd just pop a few of them in even though they are from an earlier stage in the project - but they might help make sense in pulling different bits of it all together.
Getting the sandstone rubble out of the hole was jolly hard work. I could only manage about 2/3rds of a trug - and it went down to about 1/2 a trug by the end of a day.
Various friends helped with assorted jobs. Here Jackie and her daughter, Heather, are having a break from getting the small sharp stones out of the bottom prior to me putting the sand liner layer in.
The Nutty Gnome and Himself in the hole!
The large hole inthe top soil to the right of me is a test post hole for one leg of the tea house. If you look at how close the power cable is to the post hole, then the next photo will make sense in terms of the layout of the garden - honest!
You can see the cable and the edge of the post hole at the top left of the picture. The channel being dug is for the cable to be buried in after it has been wrapped in the bright yellow plastic - to make it obvious should I ever have the urge to dig up around there again! The mound of soil to the immediate right of the yellow is the 'island' which will eventually have 5 large stones on it surrounded by moss grass. The stream will run to the top side of the island and the rubble in the foreground is the foundations for one of the paths, which comes down the other side of the island.
The blue pipe will carry water from the bottom pond to the top one.
The stream will come out of the pond roughly where the top edge of the dark soil is on the left of the picture and the top bridge will cross the stream roughly where the spade is. Clear as mud eh?!

Tuesday 20 January 2009

Rocks - and how to move them!

Right, so! We had 9 tonnes of rocks of assorted sizes to move about 100 metres uphill over grass. What to do? - and, more importantly, how on earth to do it?!
Himself being the inventive genius that he is decided that modern technology just wasn't going to cut it and we had to think laterally ..........to the Flintstones.
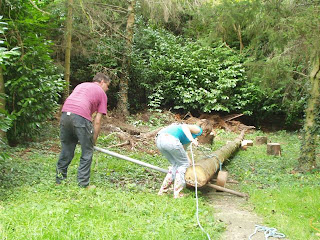
At the top of our garden we have a copse of conifer trees (actually old Christmas trees planted over the years by the previous owners of our house). One of the trees had blown over in a winter storm and had died, so Himself decided that we could kill two birds with one stone - as it were, and put the trunk to a couple of good uses. We could use part of it to build a trolley for transporting the stones and the rest for an anomometer tower to see if we'd got good enough wind for a small windmill (to keep our solar panels company). But first we had to get the trunk down the garden- via a narrow path past the compost bins, between the vegetable plots whilst not hitting the greenhouse in the process!


The tree had fallen over because the old concrete path had prevented it growing any deep roots on the east (path) side of the tree, so it had not had the strength to resist a very strong westerly wind.
Himself dug up most of the tree root base, but couldn't get it all out. It's leaning over just beyond his spade.

He then cut four slices of trunk and made holes in the middles of all the pieces for axels. I reckon that the axel was an even greater invention than the wheel!


We had some old iron pipes that made excellent levers. We used them to lift the trunk onto the wheels/axels and to move the 'vehicle' onto the path.


Himself reckons that "next time" (whaaah!) he'll get the axel hole more central!


Note how Himself adopted a supervisory role at this point! He claimed it was necessary to allow the girls to fully experience how useful levers are in the real world and how even slightly built people can move huge objects with them! Neat trick I reckon!


They then hauled the trunk down the garden.


(The Japanese garden area is to the left of the raspberries - visible just beyond and to the left of the girls.)
So the tree got us two pairs of wheels on axels and an anomometer tower - but that's a story for another day! We then had to convert wheels into a trolley for rocks..........!
Himself got two pieces of 3x2 and drilled holes in them to allow the axels to be pushed through. Although the wheels were loose and had nothing to stop them from sliding sideways (- and off if we weren't watching them!), it also meant that we had the leway to move the 3x2's to one side or the other to get the lever pole in to move the trolley sideways/up/down etc. It also allowed us to remove the wheels completely to slide the rocks off once they were in the right -ish place.
As can be seen from my expression, some of the rocks were a bit chunky and a might heavy!
Levers are wonderful!
Around me are a few of the smaller stones - we either carried them up the garden, or got our friends to, or put them in the wheelbarrow.
This wasn't the biggest rock - that took six of us to move it!
Pushing worked well on the tarmac of the yard.....
but pulling was good too!
We used towing strops from the Land Rover to haul the trolley up the lawn (well, moss really). Once on the grass, the technique involvedlaying half the strop on the ground and standing on it to pull, heave and haul the trolley until we had run out of strop or the wheels were about to fall off! The remaining wheels were chocked to stop the trolley rolling back down the hill (- it only did it the once, then we learnt!) and the strop was pulled through, we stood on it, pulled again ... and again...and again until we eventually reached the right place and levered the rock off the trolley. Himself was very good at levering rocks into the correct position in the first place - but I often then decided that it wasn't the right place after all!
The Japanese garden starts beyond the blue trampoline, up the shadey slope by the oak tree and bench and through the gap in the greenery. That slope is steeper than it looks!

Friday 16 January 2009

Still lining.....after all these years


Ceefa cat was very nearly the first casualty of the pond - he couldn't resist jumping onto the fleece liner to have a closer look at the underside of the butyl. It was only the lump that gave him away. It's no wonder Himself calls him 'Einstein'!


With the liner mostly in place, we could tickle about with the fine tuning of getting neat folds in the butyl, making smooth areas under pipework so that it wouldn't rub, double checking for cat shaped lumps and that sort of thing!
It took 6 of us about three hours to do both the fleece and the butyl liner - which maybe gives you some sense of the size of the pond. (or maybe we were more disorganised than the photos suggest?!)


A moment of great joy and excitment - for me anyway!

After almost a year of working on the garden I was finally getting water into my pond - and into my socks! Yes, that's right, I wasn't watching the water and it snuck up on me - much to the amusement of everyone else. I'm just a source of amusement some days - ho hum!


The pond took a good couple of hours to fill up with a hosepipe as it holds 5000 litres- and we're on a water meter. I was half expecting a phone call from the water board to ask us if we'd got a leak somewhere!


I love messing about in water. I was trying to get the butyl folds as smooth as possible because we were going to put some large rocks on the shelf and I didn't want any sticky-up bits to snag on the rocks and cause holes.
You can see that behind where I'm squatting the soil dips down. This is where I'd started roughly digging out the route for the stream ages ago.
ROCKS - I haven't mentioned the rocks!!!
As you can see in the photo below, there are lots of rocks - big rocks, little rocks, medium sized rocks and about half a dozen wacking great HUGE rocks, plus boulders, pebbles and pea gravel. Obviously we didn't dig these up from the pond hole, we went to a local quarry. Strange how easily you can hide an enormous quarry in Derbyshire!
When we eventually found the quarry we chose the rocks nearest in colour to our own garden rocks - Himself having thought to take a small rock with us for the outing. What a man, eh? We then ordered 9 tons of assorted sizes which were duely delivered a couple of weeks later.
A few minor hiccups were that: firstly, the lorry struggled to get up the drive -long, steep, bendy, lots of trees. Then he couldn't off-load all the pallets onto the yard area by the garage because he'd had to reverse up the drive and his grab arm thingy was then at the wrong end for unloading some of the pallets, so he could only unload about half of them onto the yard. He had to go back down the drive and deposit the rest on the turning area. We then had to use our trusty Land Rover (oh, how I love that vehicle - but that's another story!) to drag the pallets onto the yard. Then there was the minor problem of how to get the rocks from the yard to the Japanese Garden - about 100 metres, uphill, over grass! More on this later.
(for any Americans reading this, in Britain a yard is the hard standing area at the back of the house -usually paved, concreted or tarmaced. Anything else is referred to as the garden).


I know you've seen this photo before, but it really does sum up how happy I was to have finally gotten water in my pond - and I'd put dry socks on by this point too!


It's amazing how quickly water attracts wildlife!
Rachael, Laura, Owen and Jacob(L to R) reckoned they'd earned the right to paddle after all their hard pond-lining work.
The yard is behind Jacob, below the trampoline just to the left of the Land Rover and the car - just to help you visualise how far we'd got to move the rocks!

Thursday 15 January 2009

Pond lining begins!

This is Himself having a short break after we'd finished dry lining the pond with sand which had gone through our awesome home made sieve!

The photo also shows the width of the shelf I'd made for plants and rocks. It widens out under the sieve and stays that wide all down the rest of that side.
The square block in the bottom of the pond is one of 4 blocks put in place to rest the tea house legs on - oh yes, my 'little veranda' plan grew a bit (aided and abetted by Himself and our dear friend Pete) and will now have a veranda big enough to need legs!
We had some much bedrock residue that we had to pinch part of the vegetable garden to store it - hence the large pile behind Himself. This did, of course, mean that I couldn't grow quite my usual quantity of veg, but it's only a temporary thing and I will get a fabby Japanese garden and, eventually, my full veg patch back - seems like a reasonable compromise under the circumstances!
Himself just finishing smoothing the shelf sand. You can clearly see the blocks where the tea house legs will go.
The bit of shelf that Himself is kneeling on will become my pebble beach - unlikely as that may seem at this point!

This is me, the Nutty Gnome, finishing off putting the fleece liner in place - an 'interesting' job as as the little tiny pebbles slid down the back and Himself was convinced that every single one of them would cause an enormous hole if it wasn't fished out........!
(I didn't get them all out!)
The wooden stake at the bottom right of the picture was for levels and to denote roughly where the waterfall/ stream would run.
We enlisted our best friends, Jackie and Chris, plus assorted teenage offspring from both families to help us lay the liner - it's amazing what the offer of beer and chillie can do!
The butyl liner was flippin' heavy!
It took 6 of us to carry it up the garden and into the pond.


Heaven only knows what I was trying to explain to Owen - but it obviously worked as the liner got properly laid out in the end!

Part of the 'Liner Team' at work.
You can tell it was early spring due to the lack of runner beans up the poles behind Himself.
Mind you, the blackcurrant bushes and raspberry canes look good!


Monday 12 January 2009

Digressions continued

Hmm, I've not really got the hang of saving everything before I go off to edit pictures or whatever! Anyway, I'll carry on where I left off - I hope.


Above is Himself doing a bit of digging for me. The fruit cage is the topside of him and part of the vegetable garden is to the left of him. We have to cage and net a lot of our stuff because the birds, squirrels, foxes and badgers eat them or dig them up!
We are only about 10 minutes walk from the centre of town, but are lucky enough to have a large garden, with a disused small reservoir just beyond our top boundary (- through the trees beyond the fruit cage). For history buffs, the reservoir was built in the late victorian period but was only used to supply the town for a few years until they realised that having a reservoir above the town on a hilltop was, perhaps, not the best thing to do! It is now privately owned and used for fishing. The land around is has been pretty much left to run wild, hence all the animals - it's great!
This is the pond at its finished depth. The pipes sticking out on the right will eventually bring the water back up from the bottom pond and take it through the filter system.
The scaffold tower on the left houses our home made giant seive! We used it to grade all the sandstone debris that we removed from the hole and turn it into reasonable quality sand which was good enough to dry line the hole to cover any lumps, bumps and sharp bits before the fleece liner went on top of it.
It was a simple but boring process but it quickly produced as much sand as we needed. When I was dry lining, I could just about keep up with the amount Himself was producing.
At this point, we had reused everything that we'd dug out, so we were soil neutral - which appeals to the eco warrior in both me and Himself!
This is the pond dry lined - I feel able to call it a pond at this stage as it actually looks like one!
It had spent the previous winter as a very sad looking leaf gathering place and I had felt leadened by the distinct lack of progress.
Ceefa cat on quality control!
The cat was always very interested in whatever I was doing in the garden and often tried to help - mainly by pouncing on and trying to kill whatever I was using!

Digressions!


Having taken first-born back to university yesterday, I'm feeling a bit maudling today and my plans to go and clear up part of the garden to cheer myself up have been well and truely thwarted by the onset of that incessant rain that England does so well - but which only serves to darken my mood a bit more today!

So, as a minor digression I thought I'd add a few pictures of nice winter weather! These were taken in the Peak District National Park in Derbyshire, about 15 minutes drive from our house, on New Year's Day.

Enjoy!

We were on Curbar Edge - where climbers often train for Alpine or Himalayan ascents, but no-one was training that day!


It was about -5 and very misty, giving a very surreal, but beautiful sort of air to it all. It was definately a day for thermal undies!


Having faffed about with photos and enjoyed my memories of that walk, I now feel in a much better frame of mind - so, a bit more about the garden me thinks!


The top pond took some digging and ended up over a metre deep and about two+ metres wide at its widest point.


Friday 9 January 2009

Explaining 'the plan'

I just thought I'd better try to explain what my plan was/is - and see if you can understand it any better than my family did!

I had it all visualised in my head as the finished product, so my vague pointing and sweeping hand movements across the plot matched my equally vague sweeping statements about "the top pond'll go there, the stream'll come out here then meander down round there to a waterfall into the bottom pond around there-ish. The path will come in that way, but you can come in over there too if it's wet.....and they'll meet there, go past the island over the top bridge and up to the tea house."

Simple. Don't see why they didn't get it!
My basic plan had 2 ponds connected by a stream. Waterfall out of one, down the (yet to be built and properly graded) slope to drop over a waterfall to the bottom pond. An 'island' of several (as yet to be found) large rocks, bounded on one side by the stream and the other side by the path. Two bridges (material of which had yet to be identified) top and bottom of the island would allow the paths to traverse the stream and access the gates and tea house.
The tea house plan included treatment space, a wood burning stove, a couple of small windows and a little veranda (hold the thought of 'little' for future reference!) sticking out of the pond to allow for possible dangling of feet into cool, clear pond.

The photo is one sent to me by a friend as her interpretation of what I'd described!!!

Pond digging has begun....!


This is looking southwards down the garden. I have already dug the rough outline of the pond and begun to tackle the depths! It was quite hard going as there is not much topsoil at this side of the garden, so the sandstone bedrock is only about 18" down. It's also had years of being pushed about by tree roots, bramble etc, so it crumbles into large jaggedy chunks as soon as you look at it - I got through about eleventeen pairs of gardening gloves scraping it all out! I also slept well after 'digging days'!

The circle of stones will one day become my Tai Chi training circle and the small mound of earth by the green trug will become the island - honest!


Am I not the epitome of gardening elegance?!

I am standing in the footings for one of the paths. Himself (my beloved husband, Andy) thought that traffic in my garden would be heavy, so insisted that I dig footings worthy of a motorway - or perhaps he just liked me all hot and sweaty!!!

The hosepipe is the proto-stream in that it shows where I wanted the stream route to end up - which it (more or less) has!

As the digging was such hard going - and jolly boring, I kept switching onto other, more interesting, things hence the reason it all looks 'bitty' at this point. Plus I was still the only one who really understood what I was trying to achieve!

Wednesday 7 January 2009

In the begining....


In the begining, when we first moved in to the house, the garden was a fairly tidy but bland place. The previous owners loved all shades of green but, apparently, no other colours! They were elderly and the garden had been pretty much left to its own devices - hence the vast amounts of brambles in all the borders, but especially in this area!

My ideas for the Japanese garden were very clear in my head - but far less clear when I tried to articulate them to my long suffering family. So I initially settled for planting 3 different sorts of bamboo as my lower boundary and left them to get on with some serious growing whilst we tackled the necessary renovations indoors......4 years later, the bamboos were fatter but I was no nearer having my garden.

Having continued to fail to convey my ideas, I decided to just get on with it!
My friend and staunch supporter, Sarah, came to help me clear the area, along with my younger daughter, Laura. Proof of the state of the area before we started was lost when I accidently deleted a load of photos from my husband's camera (- I am not the most technically proficient of people at times!), so you'll just have to believe me about just how bad it was.

Confessions of a novice gardener!

A few years ago, when we moved into our current house, I had the inspired idea (hah!) to create a Japanese garden in one part of our garden. The plan included a small tea house for me to use as my treatment room to provide reiki and reflexology to willing victims!
In my mind, I naively thought that this would take but a few weeks to do - two and a half years later it is still under construction! This is the tale of the progress - and lack of, of the garden!
The plot for the Japanese Garden is about 26' x 45', facing more or less north/south and on a slope. It was covered in spirea, bramble, heather, bramble, privet, bramble, large unkown straggly bushes (spot the knowledge, eh!), more bramble....etc. it took 3 of us 10 woman days to clear it - I really should have known at that point that my simple plan was perhaps not quite so simple after all!


The plot is cleared - except for one particularly stubborn privet tree - had to resort to man power to dig that out. Thanks to my husband,Andy, for that!


My initial pond and tea house plan - the outermost planks are the veranda.


Me hard at work doing the final digging on the top pond.


We enlisted help from the local rabble (our best friends, Jackie and Chris and their assorted offspring) to get the HUGE pond liner in place.
As the pond filled, it quickly attracted wildlife!


The pond as it was early last summer.