Monday 22 December 2014

Merry Christmas!

 
It's been a funny old year one way and another, but Christmas and the New Year beckon so I'd like to wish everyone in Blogland and very Happy Christmas and wonderful 2015.
 

I also want to thank everyone for reading my blog and for putting up with the huuuuuge gaps between posts! I'm hoping to get back into blogging again properly in the new year :-)


May your celebrations be joy-filled and I hope Santa  will be good to you!

Ho, Ho, Ho!

Thursday 23 October 2014

Erm....Oooops!

Erm.....oooops indeed. I'm not quite sure where the summer went, except in a frenzy of gardening, but I certainly didn't quite get round to blogging - but here we are now, ready for another except from the delayed tales of how to build a Japanese garden!

Some of you with sharp eyes and long memories might remember that in the early days of the garden, oh so long ago now, there was a fruit cage behind the the tea house....frequently complete with a football care of the son of Mrs. AnotherBloodyEyesore! This photo is from May 2011 - oh how things change! ;-)

Anyway, that summer we had Big Bud Mite on the blackcurrant bushes in the cage and the only rememdy was to dig the fruit bushes up and burn them ...incurring the wrath of Mrs. A.B.E yet again because she had some laundry out! BUT given that my magic eyes aren't quite strong enough to see through a 6ft high, 3ft wide thick holly boundary hedge and it appears that she always has laundry out so that she has an excuse to shout at people, it was a risk I had to take! 

Anyway, I burnt the bushes, survived the verbal mauling from our delightful neighbour and resisted the urge to get drawn into pointing out how often their footballs had damaged our plants, landed in the pond, nearly hit us on the head, etc.etc.etc before realising that I couldn't replant new bushes in the same place in case of recontamination from mites in the soil. 

Relocating the fruit cage meant that suddenly there would soon be all this unclaimed land up for grabs! .....Now what could I possibly do with that eh?!
I have to confess that I was never particularly happy with having the fruit cage directly behind the tea house as I felt it detracted from Himself's work of art, but as the fruit cage was there first, I'd never come up with a strong enough reason to shift it - until now!

But it was summer and the redcurrant and gooseberry bushes were still in fruit so moving the cage had to be an autumn job if we didn't want the birds, squirrels, foxes and badgers to get to the fruit before we did! However, having got rid of the blackcurrant bushes, there was space inside the cage to work! I laid out my trusty bit of old hosepipe to form the route for a new path I'd envisaged and Himself kindly offered to dig it for me - and who was I to refuse?!


 It was hot, hard work ...glad it wasn't me that was digging! I was nice - I kept the pints of water coming!

Once the path was dug to a  depth suitable for motorway foundations, Himself raided our sandstone store up the garden (which was created with what we'd dug out of the pond years ago!) and used that as hardcore foundations. I got him to pile all the topsoil up to create a 'mountain' for the path to curve round and to give that very flat area some topological interest (Ooh er, there's posh!)

 The mountain in the background.

And, as usual, the new bit stayed like that for quite some time! Well, actually, that's not quite true! Being me, I couldn't resist a bit of instant gardening, so I pinched various grasses and ferns from other parts of the garden to use purely as temporary fillers, planted the Killmarnock Willow that our lovely neighbour, Tony, had bought us as a Silver Wedding anniversary present.......

Found a few Hebes going for a song on the 'Rescue' table at the local nursery....unlike the Twisted Beech, which was also at the local nursery, but wasn't exactly going for a song!

I then bought some Irish Moss as ground cover.

And I left it to get on with its own devices for 3 years until this spring!

I wanted to join up the now-not-so-new path to the veranda, so Himself had to move the huge rock that had acted as a retaining rock when the fruit cage had been behind the tea house, from its original upright position to a horizontal position to make a step from the veranda to the path.....no mean feat given the size and weight of the rock and we bent the scaffold pole lever - again!


 You can see here that the grasses have become too dominant and need to be moved - fortunately I appear to have got myself involved in the after-school gardening club at one of the primary schools we teach tai chi at, so the grasses have found a new home as part of the redesign of their raised beds in the playground ....quite useful that I was doing the redesign really! ;-)


Anyway, the next few photos were taken yesterday - and our trusty bent scaffold pole makes a very good netting support to keep the leaves out of the pond. A bit over-engineered (as ever!), but it keeps Himself happy!

The grasses have gone, the hebes have grown, box balls have found a new home and the Irish moss, which worked well in the very wet summer of 2012, didn't like the direct sunlight of 2013 and died, so has been replaced by a creeping ground cover that I don't know the name of and don't have a photo of either!


I've finally made a start on doing the path edgings - bought a load of old  roof tiles from the local reclaim yard for 35 pence each - bargain! The path, which will soon be covered in weed repellant matting and a thick layer of pea gravel to match the other paths, now joins the veranda step at one end.....

goes up to curve round past the twisted beech on the mountain.....

and has currently got as far as my lovely Buddha statue, which was a Christmas present from our best friends - they know me so well!

There is still a way to go yet though - but I'm hoping to get it finished off during the half term holiday next week if the weather is kind to me!

The sharp-eyed amongst you may have spotted a certain final bit of annexation! There was a metre (or so) beyond the back wall of the fruit cage that went up as far as the concrete path just behind the maple tree. This area was originally planted up with rhubarb and blackberries which appear to have moved themselves to the other side of the garden to be with the rest of the soft fruit ;-P

Various other bamboos, cornus, pieris, hebes and an acer have somehow appeared in the empty soil ...don't know how it happened! 
I have now had very strict instructions from Himself that I am not allowed to annexe any more of the garden :-D

Friday 27 June 2014

Many years ago.......

.....in a small market town in Derbyshire, some fool decided that building a Japanese garden and tea house would be a good plan and probably wouldn't take all that long. That fool was me and eight years later, it's still not finished! However, we have just about finished renovating our 1920's house, learnt how to grow fruit and vegetables, made a lot of other changes in the garden and had a life with our gorgeous daughters, so all is not lost!

I'm not known as a speedy blogger and many of my posts refer back to stuff we did ages ago - ok, MOST of my posts are about about stuff we did ages ago...life gets in the way of blogging at times! Today's post is no exception. Today we're going back 4 years to the finishing off of the top pond and the tea house courtyard....if I can find the right photos after all this time!

We'll start with Himself putting my granite lantern into the pond....and making it work, obviously!
He put a couple of large flatish stones on the pond shelf before drilling a hole for the wire in another stone and resting that on top. The water looks skanky because we hadn't got the filter working at that time - the water is lovely and clear now.

 The granite lantern came in 4 parts - because it was chuffing 'eavy and couldn't possibly have been hoiked into place as one complete lantern. The base went on top of the drilled stone,

it was of course perfectly level!
The light was then threaded through the hole and the wire was carefully placed in the small gap between the 2 base stones.
The clamps and stuff on the edge of the tea house veranda were because Himself had glued some mahogany pieces onto the edges to completely encase the softwood and protect it from the weather.
The second piece of the lantern went on next. In Japan, the windows are open  to the elements, but our elements are a bit too inclement for that, so I used pieces of plastic milk containers to provide protection - an idea I borrowed from Purelands, a Japanese Garden and Meditation Centre near Newark which is well worth a visit if you're in the area.
The mountain of soil inside the fruit cage will get explained in another post very soon!

Himself making sure he'd not dribbled glue onto the grantite whilst sticking the third piece on!
The fourth piece finally in place.
 Once Himself had done the heavy work, I could move in and do the arty-farty bit! I covered the shelf  and the surrounding edges with more small rocks, stones and pebbles. If there is one thing I can't abide with home-made ponds it's being able to see the liner - you can't see any liner anywhere around my ponds.......except if you lie on your tummy on the veranda and peer back underneath to the bit I can't get to! :-P
 A goodly chunk of the pond shelf and edge sorted and the waterlillies in place in the deep bit of the pond.
Himself's next task (it's begining to sound like 'The Twelve Labours of Hercules' here!) was to make me a Tsukubai - a stone water basin. Traditionally they are smoother on the outside, often rounded, but hey - we had lots of big rocks lying around the yard....!
First he drilled a load of holes,

 before chiseling the stone out
 to make a nice smooth central water hole.
The only slight problem was that he'd done the job down on the yard and the tea house courtyard was about 100 yards up the garden! Everywhere is UP in our garden, including the stone, which was levered up
 and placed in our long-suffering wheelbarrow for Himself, Last-Born and the Drummer Boy to take up the garden. I can't remember which bit of me I'd injured at that point or how, but I was on light duties and therefore exempt from rock hauling!
hence we got photos.
There are no photos of getting it into place because I was too busy bossing them around and choosing which face of the stone I wanted facing outwards to take any!

The Wonderful Pete had put the step stone in place the previous weekend (but can I 'eckerslike find those photos!) and I laid down the stepping stones - in Japanese gardens the stepping stones are always deliberately close together to make you slow down as you walk on them so that you have chance to take in your surroundings.
They were then taken up so that sand could be put down

A fully sanded courtyard.
Then some left over butyl pond liner was put on top of the sand as a weed suppressant
before I had the fun job of putting all the pebbles down in the courtyard - individually handpicked and carefully placed, obviously!
 before putting pea gravel on the path from the bridge to the courtyard and blending in where they met. And so it has remained ever since!

To finish off, I've added in a few photos of how it looks now at 6.45pm on a grey and wet June day - when we've had stonking hot sunny weather for days, I know, I know - should have taken 'em yesterday!

 There will one day be a rainchain from the roof to the basin to fill it with fresh rainwater. At the moment I use the ladle to fill it with pond water ...but I do have to be careful at this time of year as I have been known to accidentally ladle tadpoles in as well!


 The granite lantern is a bit greener than it really ought to be ;-P


 Hope you enjoyed your tour? It's not finished yet....will it ever be?! I'm in the middle of replacing a lot of the 'filler' grasses with hebes, euphorbias and box balls. I'm also planting moss and other ground cover. Still got 2 paths to finish and some other stuff to do, so watch this space!

Wednesday 9 April 2014

The Pond Building Saga Continues!

 Right, a bit of a warning before we start....it's a long one this one! You might want to pop to the loo, make a nice cup of tea or get a glass of your favourite tipple to keep you company as we go! We're off back to last summer again.
Before we could start on the bottom pond properly, we had to sort out the waterfall stone out of the top pond - it's never straightforward is it?! The waterfall stone was a 50p offcut from the local stonemason's scrap pile a few years ago and was never a brilliant stone. It really didn't like the hard winters of 2010 and 2011 - the frost and snow caused it to split along its natural striations and the top pond slowly went down by about 3 inches, which was somewhat worrying at first as we spotted the water level drop but didn't know the cause. I spent ages one weekend carefully working my way around the entire edge of the pond, moving stones, checking that the edge support hadn't failed, looking for tears etc, but all to no avail - which left a split waterfall stone as the only answer.

We aquired an old stone step from somewhere (but I can't remember where as it was so long ago!), which was a bit big and needed cutting to size.I shifted the streamside stones out of the way then Himself and I gently peeled the glued liner away from the original, broken stone, lifted it out....and it fell to pieces, so at least our deduction about the cause of the water level drop was proved correct!!!

The only time Himself really pays heed to the old 'elf n safety' is when he's using the chainsaw or the stone cutter and duely kevlar gatered, gloved and helmetted up he set about cutting the stone to size, having measured and checked several times each side that had to be cut .
It has to be said at this point that our dear, happy, cheerful neighbour Mrs AnotherBloodyEyesore was absolutely delighted by the stone cutting and yelled jaunty encouragement over the hedge at us for a good ten minutes! She is such a joy! ;-P

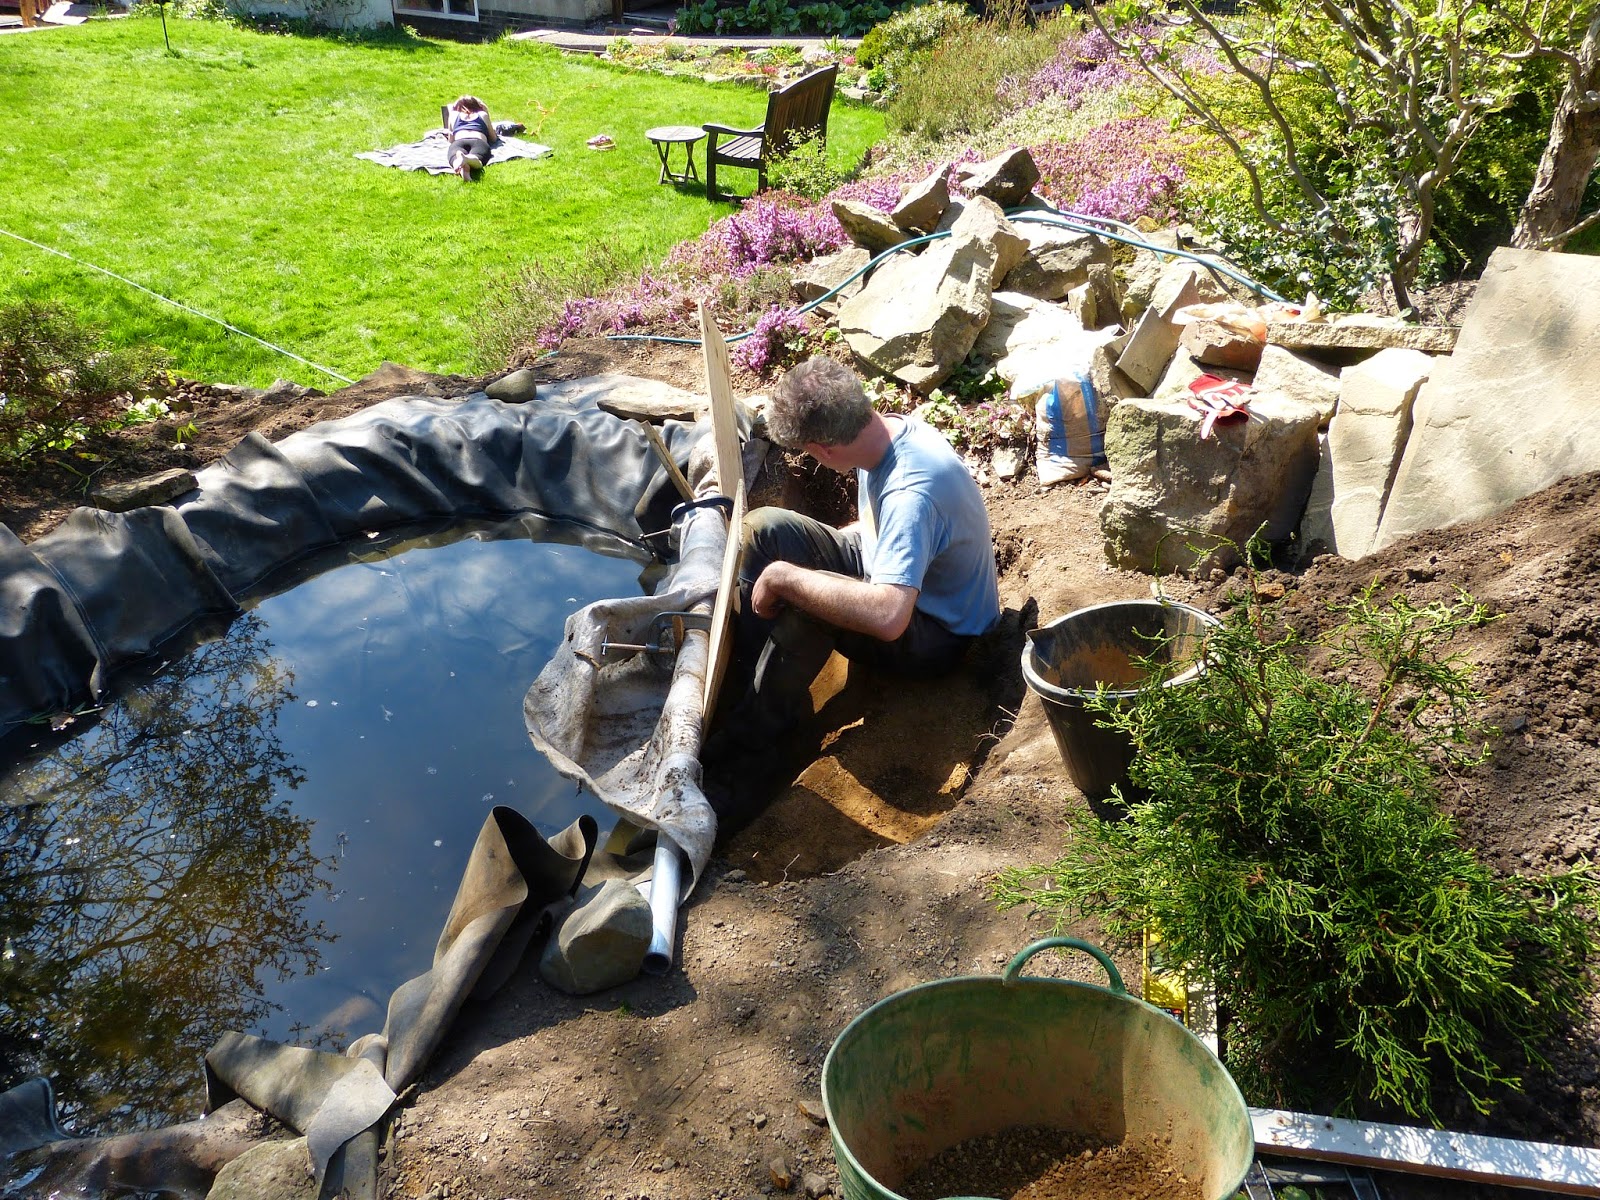
Once cutting was completed Himself put it in place and tickled about with it until it was completely level.

 Then he stuck the liner onto it.....

 made a little dam wall out of gaffer tape to check his levels

and we filled the pond back up to its original and correct level. After two years of low water it was lovely to have it back to normal again....however, I then had to try and retro-fit all the streamside stones back into their old - and sometimes new places.


It didn't end upquite the same as previously, but I was still happy with the result.


Himself had a little respite from playing with big boys toys by spending time packing sand onto the shelves on the bottom pond in preparation for the arty-farty stone placement. Last-Born, as you can see, was fully engaged in the whole pond building process and in there getting down and dirty with us - not!


 The following weekend The Wonderful Pete (TWP) came up to help. He has done this so often that there is no way we can ever repay his imense kindness....other than with lots of good food and nice wine or beer when he's with us, obviously!
Anyway, we started off shifting the stones onto the pond shelf using  the scaffold poles to hoist them in.....

but the second stone bent the pole, so we had to bring the big guns in! Given that we  were working on a sloping site with veeeeerrrrry heavy stones, it seemed prudent to fill the trugs with stones and put them on the scaffold boards for a bit of extra ballast.....just in case! It may not be elegant, but it does work.


 With lots of hoisting, pulling, puffing, panting and just the occasional  rude word,

we got the big rocks in  place along the back of the pond to create a supporting wall

and then down the far side of the pond where the shelf is at its widest point.

Once the big rocks were in their 'right' places ...which did involve shifting one or two of them into different places a couple of times until the Art Department (me) was happy with them...even if Himself and TWP were less than impressed with me! I then hoiked various smaller stones around happily for about 3 weeks, or maybe it just felt like that?! until I was happy with the overall effect.

Then we ran the stream to get the levels in the bottom pond right and see how it all looked.

Somehow, somewhere along the way, even though the pond's hard landscaping wasn't complete some plants managed to jump in and get settled down...don't know how that happened! I then spent some time building up the bottom part of the stream and the waterfall - contrary to popular family belief, this was NOT faffing about with rocks and stones, this was serious naturalisation of an artificial pond!
It's surprisingly hard to get it right!
I then moved onto the not-yet-garden and planted various plants that I nicked from other parts of the garden and some grotty unloved Hebes I bought for pennies from the 'rescue' table at the local garden centre.


Once I'd finally finished playing getting it to the point where I was happy with it, it all got left until a couple of weeks ago - yes folks, this year!!! when I decided that I really couldn't bear the lack of proper garden or skanky, messy and frankly slightly unsafe hotchpotch of flagstones and mud that made up part of the still unfinished path for a minute longer. So I started off by transplanting all the 'mind your own business', moss and other ground covering plants that had been taking over aprts of the path that has been in situ for 2 or 3 years so that I had a clear view of things first. It took a surprisingly long time to do that!

I followed this up with a bit of excavating down to the sandstone path  foundations I'd put in about 4 years ago (things really don't happen quickly on this project!) and getting the levels right, followed by a few hours of digging of slots to get the old roof tiles in to create a nice level edge to both sides of the path - aided by a bit of stick carefully broken to the right length to act as my path-width measurer ...technology? Bhah!
and finished off by laying the weed supressant membrane and covering it in a couple of inches of pea gravel......followed by some serious arty-farty pretty gravel soothing to make me happy! Doesn't take much does it?! :-P


So I now have a complete and safe route to both bridges....and as it's a bit steep in places I might well end up putting stepping stones into the gravel as I suspect I may find lots of gravel down by the bottom bridge!

The plants in the pond were put in last year, as were most of the plants around the edges, but I have plans! They mainly involve Hebes, Box balls, moss and the like, but possibly not more bamboo - unless a very pretty one catches my eye!

To finish off then, a little quiz!
Spot the name of one of my favourite films in this photo! A smugness award to the first person to get it :-)