Showing posts with label concrete moulds and posts. Show all posts

Saturday, 31 October 2009

The second post!

October this year has been glorious .......warm, dry, balmy sunny days with blue skies and very little cloud or wind. So warm in fact that last night I walked down to the local Indian restaurant without a coat on! However, November has arrived with a bang today - the temperature has plummeted several degrees overnight, the sky is steely grey and the horizon is invisible because of the rain pelting against my windows- which are rattling ominously in the face of the gale. The leaves are flying past horizontally, to eventually land in sodden red heaps on the drive and the lawn but I am safe and warm inside, huddled up in my snuggly hoodie and fluffy boots (well, and my jeans - obviously. I'm not that weird!).
Welcome to Autumn, Derbyshire-style!


Let me take you away from the dismal day outside and back to hot sunny days when the world felt good ......... and the second post went into the pond! Chris and OJ weren't around to provide muscle, so we roped the Gnomelets in to help. That was it - three girlies and Himself, our full workforce for the day!


Himself wanted to do things the same way as last time but, despite my love of adventure, I refused point-blank to stick my head down a muddy, mucky barrel whilst balanced precariously on my knees on a wobbly plank over 4 foot of very wet water!
Another way had to be found!


I was convinced that the way I had suggested last time (and been ignored about!) had to be quicker and easier - especially given our current lack of muscle, so Himself agreed to give it a go. We tried it out first on the original post because Himself wasn't happy with how the post was sitting on the cement-filled pillow. He'd accidentally made the mix with sharp sand rather than building sand, so the mixture didn't 'flow' in the pillow and had set lumpy (note excellent use of technical terminology there!), causing the post to be unstable and not truely vertical - a problem which, if not resolved, would have a knock-on effect throughout the rest of the building. We used the chain-hoist to raise the post up and out of the way and lifted up one edge of the pillow with my big leaf catching net so that Himself could reach it to lift it out of the pond.

We then made a new pillow filled with a nice flowing cement mix .....


slid it into the pond .....


pushed it into place with the handle of my trusty net ......

checked it was in the right place ........ ooh look, I'm on my knees on a wobbly plank over 4 foot of water!

lowered the post back down and popped the wooden post back on top. Easy!

Now convinced that this method would work (!) Himself did some precision measurements for where the second post should go .....


sighted it against the first post now sitting snuggly and vertically on its new pillow.....


then we did the same process with the second post.

For some reason I was back to my old familiar position of 'counterweight and shover of big beams with heavy things on the end' ........... but apparently this does not yet qualify me as Technician Third Class, it only keeps me at Grunt Worker level - one day I shall achieve promotion ...well, a girl can dream can't she?!!!

Placing the post onto the plank .....


First-Born in charge of the chain-hoist and lowering the post into the water - I have to say she wasn't exactly thrilled at the prospect!
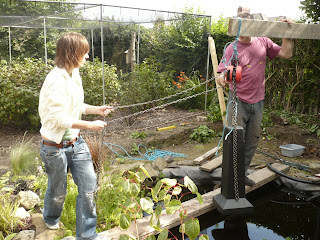

post in place and being checked for stability on its pillow .....


and the really exciting bit ......... the first horizontal post is brought into play!


getting nearer .......


and nearer ..... it was flippin' heavy and jolly unwieldy too! Oh look, yet again I'm on my knees in an unstable position near water! I'm begining to think that he's secretly trying to topple me into the pond!


Having got the beam into place, Himself decreed that we should take both bits back onto dry land, assemble the two upright posts and the horizontal beam there, then lift the whole job lot onto the concrete posts - simple eh?!
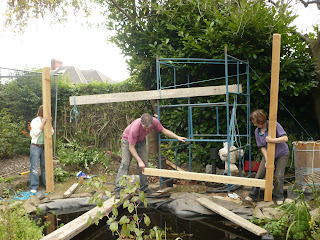

When Himself was using a bit of persuasion I became the brace ....... suppose it made a nice change from being a counterweight! (but still no promotion!)


We then carried/walked the completed structure on wobbly planks out to the posts. Himself's plank is precariously balanced on the edge of the concrete post!


The structure was carefully lifted into place so that the holes in the bottom of the posts corresponded with the metal locators on the concrete posts and pushed down to fit tightly onto the posts. It was hard work!


Enlarge this photo and look at the bubble in the spirit level - precision engineering or what?!


Finished - and tied off on a couple of suitable posts to keep it vertical whilst the cement set.


Total time taken = 3 hours :)
Total time taken to get ONE post into the water last time = 5 hours and one wet Chris!!!

and there I rest my case m'lord!

Tuesday, 1 September 2009

The Tea House work starts to get technical!

Having finally got to the point of clearing the area for the tea house (as seen in the photo below), we could start making the various component parts that would build up into a Meccano-like kit that would all fit together to create the composite tea house - hopefully!


Himself had decided that we couldn't use wooden posts to go into the water to support the tea house, so he crafted (and it was definitely crafted, rather than just made!) a mould to make a concrete post instead. It was tapered to both look more aesthetically pleasing (although quite who was going to notice under water wasn't discussed!) and to make it easier to get the post out again once it had set - because we had to re-use the mould for the second post. He also, bless him, used filler on the top corners so that the post would have rounded corners when it was finished - this man really thinks of every little detail!

In the photo below you can see that the mould is raised off the ground ...... this is to allow room for the stainless steel pipe that Himself inserted so that the wooden post could locate onto it for
stability and accuracey when adding in all the other posts and beams of the framework.


Being a reincarnated Victorian engineer, he couldn't resist a bit of extra strengthening - "just to be on the safe side". He drilled a few holes in the pipe then bent a few wall ties and inserted them into the pipe and into the mould for a bit of extra reinforcement ....... if there is ever an earthquake in Derbyshire, my tea house will still be standing!


The completed post with its lovely rounded top!


Himself with one of his more complicated joints. This one is an external coner post with the slot cut to take the corner roof rafter.


Ceefer cat doing the health and safety check as we started to bring the wood out onto the yard for the trial assembly! This was the 'dry' run (ie, with no glue!) to make sure that all the joints were accurate and that everything fitted correctly - not that I had any doubts about the standard of Himself's meticulous work, but he reckons it's far better to check twice and glue once!
First used as a counter-weight, now just a weight! Ho hum!


We borrowed our best friends' son, OJ, (also know as our 'spare son' or 'my boy'!) to help erect the frame as he's considerably taller and stronger than I am. The frame quickly began to take shape.

Some joints needed a bit of persuasion ............

some needed a bit of chiseling out.............

but by the end of the day the frame was up and looking good - even if it was in the wrong place!
This is the complete external frame. The actual tea house will cover 4 posts of the long side and 3 posts of the short side, giving an internal dimesion of roughly 8ft by 10ft ('roughly' because I can't remember the correct metric measurement having been brought up on feet and inches!) with a 1 metre wide, L shaped veranda taking up the rest of the space.

Looking up, with the purlin ring in place which will support the weight of the roof.
The diagonal piece is for support, but it's also the gap through which the wood burning stove chimney will go!

Whilst all this was going on, I was cracking on in the Japanese garden. I couldn't wait to get some planting done! I have to confess that I didn't (er ....... still don't!) have a planting scheme drawn out. I have done some research on what plants should be in a Japanese garden and I know which plants I like and want in there. Once I've aquired them (mainly by virtue of asking for garden centre vouchers for birthdays and Christmas!) I just play around with placing the pots until I think they look right, balancing size, colour and textures!
This is looking up towards the pond, which is a couple of feet past where my spade is, from the bottom path. I dug up all the stepping stones from their straight line (bad!) and re-set them in a more curvacious line (good!) before working out which plants I wanted where ........ although two of these plants have since been moved to better positions elsewhere in the larger garden - but I thought they looked right at the time!
I am convinced that plants do well in our garden because I keep them permanently worried! I shift them at the drop of a hat, regardless of whether it's the 'right' time of year - if I want to move them then it's obviously the right time!

Planting a bamboo.
Job done - for the moment!


I then began work on the ground near the beach, being careful to leave space for a rough access path near the fruit cage for when we construct the tea house (and for where my weeping willow will eventually be!).
The pea gravel path in the foreground is a tester area about a metre long and shows what all the finished paths will eventually look like. The path was dug deep - I know how deep ... I dug it! It was filled with motorway grade hardcore previously dug up from where the pond now is. It was topped with fine grade sandstone and sand - also gained from digging the pond, before a layer of Weed Stop (metallic coated weed control fabric) was put down and the pea gravel spread on top. The path is edged with 1920's 'Tucker's Mixed' reclaimed roof tiles - left over from a load we'd sourced a few years ago when the house roof need some work doing on it and the tiles had to match into the existing ones.
The tall plant in the foreground is a bush Acer - but I'm cross now because I can't find the label I'd carefully kept to identify it correctly!!!
However, the other tallish plant next to the flagstone path is an Acer palmatum 'Kotohime' - Hah! Kept the label for that one!
This is the bed above the island with the stones on. The path to the bridge runs to the right immediately in front of the large rock. This photo was taken this time last year and the bed has matured beautifully!
That is Acer palmatum 'Ornatum'.
Looking back down the garden from near the beach. A. p 'Ornatum' is on the left, Acer p 'Emerald Lace' is on the right. You can just see the island and how well the moss I transplanted from the lawn has done. The bamboos in the background form the bottom boundary of the Japanese garden, the righthandmost one is Black Bamboo. I planted these about 7 years ago when I first began to think about creating the garden!
Phew - I thinks that's probably enough for one post ...........!